Colours
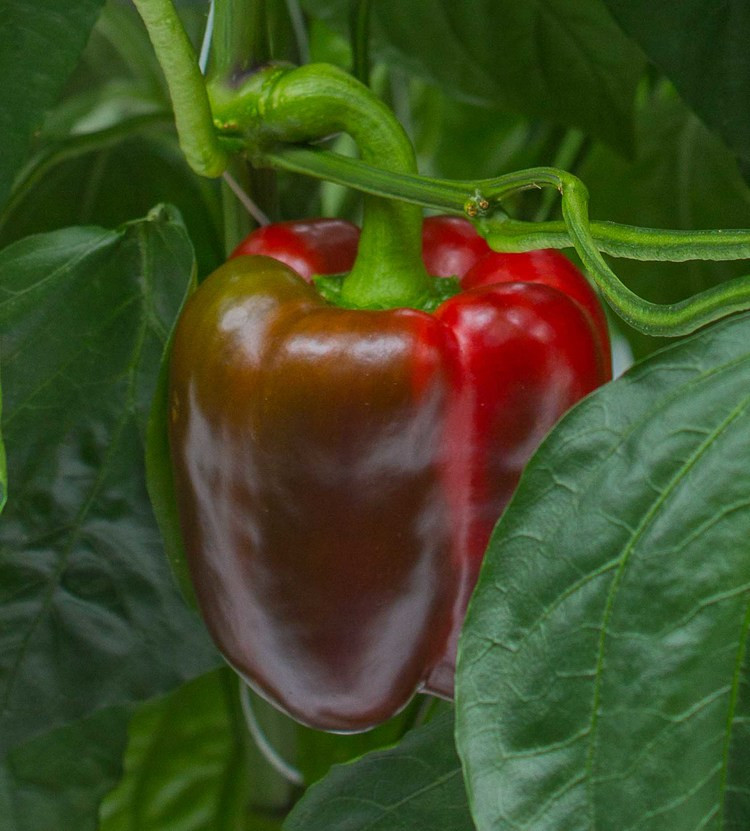
Greenhouse sweet bell peppers are a high impact superior product primarily grown in 3 colours; red, yellow and orange. No matter what the final colour of the pepper, all sweet peppers start out green in colour and the final colour develops as the fruit ripens. The colour of the mature pepper is determined by the cultivar grown. Harvesting the fully-sized peppers when they are still green is not profitable, as the mature coloured peppers command a better price.
Growing cycle
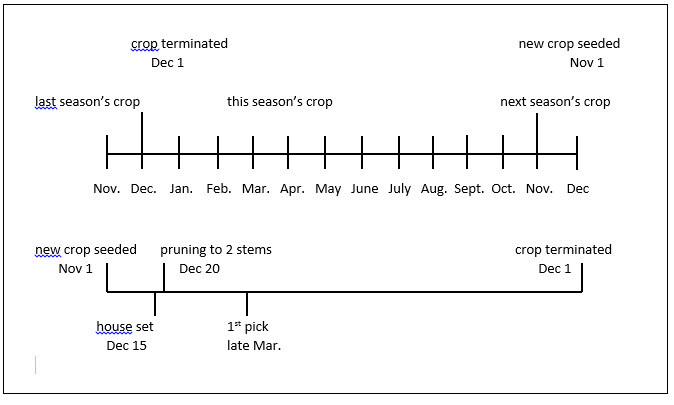
Greenhouse pepper production is based on a full year cycle (see Figure 3 below). The transplants go into the production greenhouse in approximately mid to late December at 6 weeks of age, the first pick of fruit begins in about late March, early April and continues to the following December.
The greenhouses are empty for only 2 or 3 weeks during the year to allow for the removal of the old crop, thorough cleaning of the greenhouse and setup of the greenhouse for the new crop.
One crop a year is grown. That is, production for the entire year is based on the same set of plants. As it takes approximately 20 weeks (4 months) from seeding the crop to first pick; as a result, growing more than one crop a year is not considered profitable.
Figure 1. Ripening red sweet bell pepper
When the cropping cycle is considered, it is not recommended to carry a fully producing crop over the month of December. This is because the lower winter light levels do not support profitable crop production. This is also the reason why December is usually the month when crops are pulled and the new crop goes in. The use of supplementary lights are also generally not cost effective for trying to carry a producing crop over the winter months, through December, January and February. The prices received for the crop in the winter months are always higher than in summer when the greenhouse produce competes with the field produce. Winter production would offer considerable price advantage for produce if the yield and quality of the fruit were maintained.
As crop production techniques improve, running a producing crop over the winter months may prove profitable, and staggered crop schedules and inter-cropping (planting young seedlings amongst an already producing crop) may allow for full year production. However, this web page discusses pepper crop production following the single crop cycle outlined in Figure 22. An approximate target yield for introductory growers would be 23 kg/m².
Figure 2. Yellow sweet bell pepper
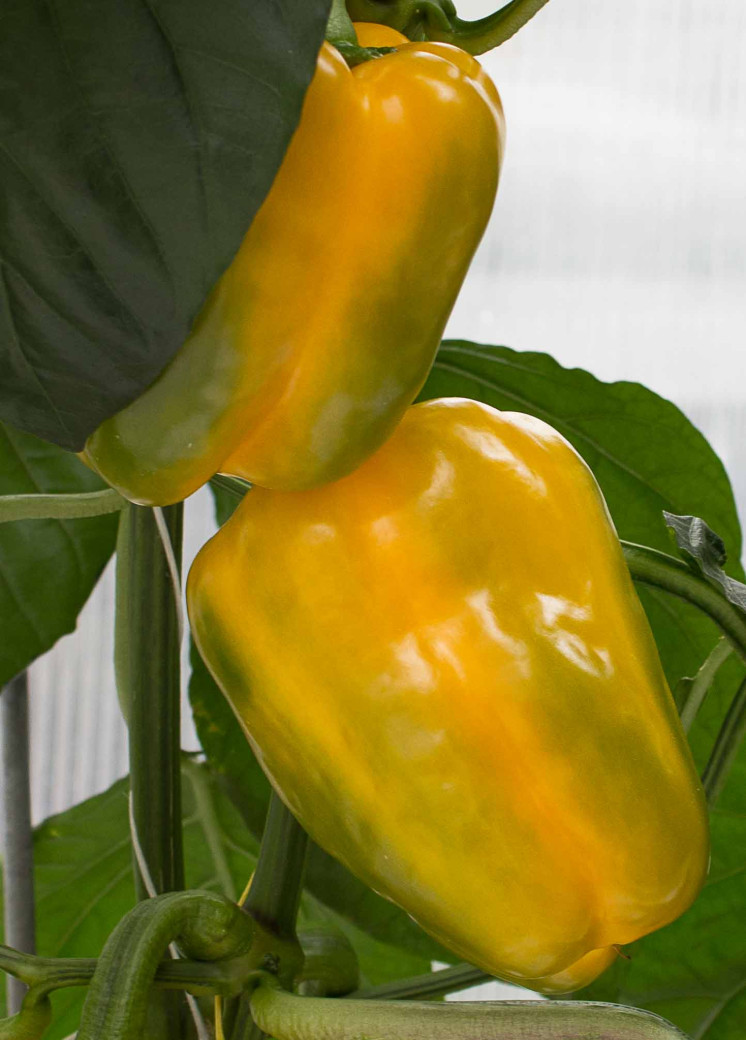
Figure 3. Typical sweet bell pepper production cycle
Height considerations
Sweet bell peppers are grown as a tall crop, so provisions for working a tall crop must be incorporated into the greenhouse in order to grow the crop successfully. The main structural consideration for greenhouse sweet pepper production is the height of the greenhouse – the gutter height. A minimum recommended gutter height for sweet peppers is 3.9 metres (13 feet). The trend is to build greenhouses taller, with some greenhouses as tall as 5 metres (17 feet) at the gutters.
The overhead support wires that support the weight of the plants are generally 0.3 metres (1 foot) below the gutter. This serves as an approximate limit to the crop height. Having high gutters allows for a level of forgiveness’ in pepper production. If the plants become unbalanced during the production cycle and put more resources into vegetative production, they can grow taller in a short period of time. With higher gutters, growers can bring the plants back into balance without necessarily having to worry that the crop will reach the roof too early in the crop cycle, resulting in early termination of the crop.
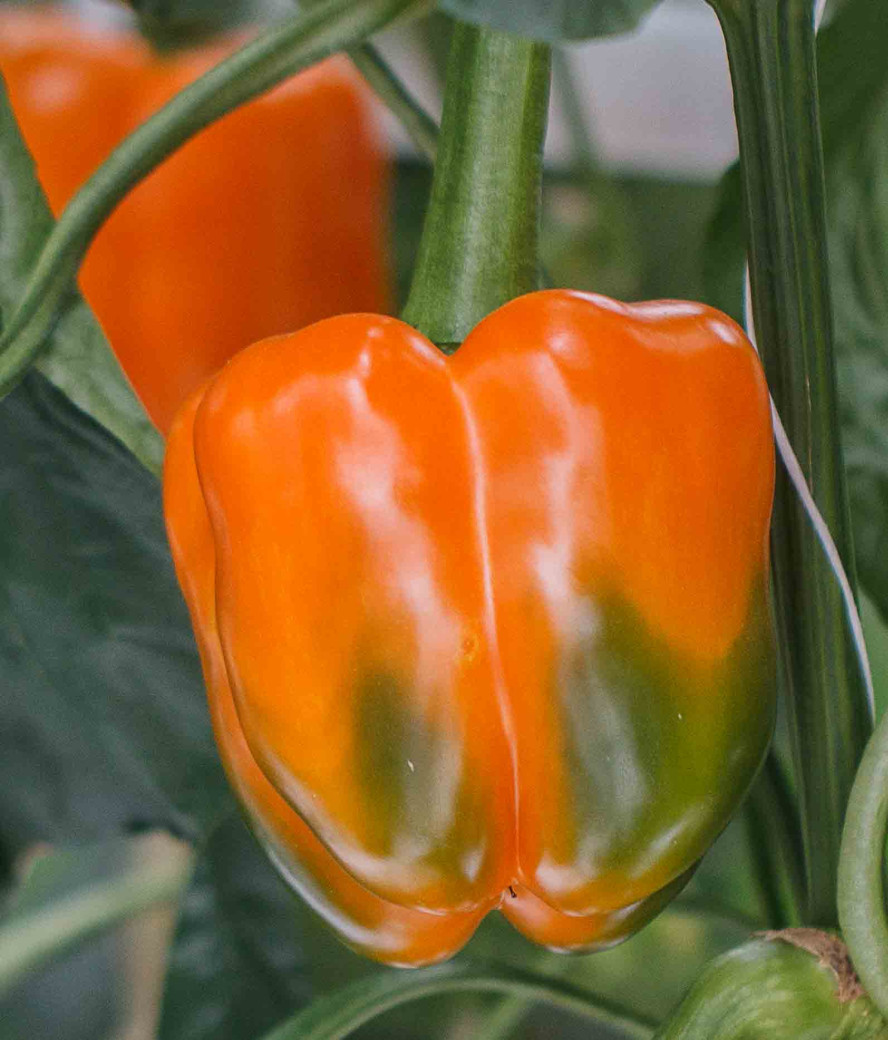
Figure 4. Orange sweet bell pepper
Other considerations for working the pepper crop as it grows taller are provisions for being able to work with the plants, pruning and harvesting. The pipe and rail system allows for electric carts to run on pipe rails along the length of each of the rows of the crop. These carts have adjustable platforms that can be raised to allow employees to continue to work the crop as it grows taller. It is important that the carts be designed for maximum stability when tall crops are worked and as gutter heights increase in new greenhouses. The width of the rails also have to increase to ensure the safety of those working on the carts.
Figure 5. Young sweet bell pepper developing towards full size and eventual mature colour

Cultivars
Selection of greenhouse sweet pepper cultivars is dependent on colour, disease resistance, performance and yield. A variety of seed companies and distributors offer greenhouse sweet pepper cultivars, and the latest cultivars are always subject to change when superior cultivars are developed.
Before selecting cultivars, investigate what is currently being grown by the industry in your area as the suitability of cultivars can vary depending on region (Portree 1996). It is also not recommended that more than one colour of pepper be grown in the same greenhouse unless they are grown in separate environments. The cultural requirements of the different cultivars can be distinct enough to require that the environments be managed differently in order to obtain maximum yield.
Propagation
Seeding
The seedling nursery or propagation area should be cleaned and disinfested with a 10% bleach solution or other disinfesting compounds. Ensure that fresh seed is used; seed greater than one year old can have reduced germination and vigour.
Seeding takes place around November 15; the date can vary depending on the grower. Seed into rockwool plugs that have been wetted with a feed solution with an E.C. of 0.5 mmhos at 25 to 26°C. Use a standard pepper feed solution at approximately pH 5.8, and that has been diluted from an E.C. of 2.5 to 0.5 mmhos.
Ensure that the temperature of the seeded rockwool plugs is maintained at 25 to 26°C during germination, and maintain the relative humidity in the nursery at 75 to 80% ( VPD of 3 to 5 gm/cm³). Maintain air temperatures at 25 to 26°C day and night.
Do not allow the plugs to dry out, keep them moist using the warm (25 to 26°C), 0.5 mmho pepper feed solution.
The pepper seedlings should begin to emerge in about 7 to 10 days, use supplemental light to ensure approximately 140 to 160 W/m² , 18 hours a day (Portree 1996, Demers and Gosselin 1998).
Once the seedlings have emerged, the temperature of the rockwool plugs should be reduced to 23 to 24°C. The seedlings can be misted lightly once a day for the first 4 days after emergence. Four days after the seedlings have emerged, allow the relative humidity to drop to 65 to 70%.
Do not allow the rockwool plugs to dry. Apply light applications of the 0.5 mmho feed solution; the plugs should be moist but not sopping wet.
First transplanting: Into the rockwool blocks
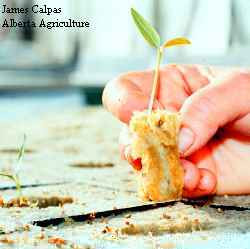
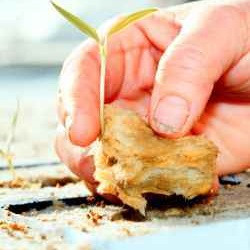
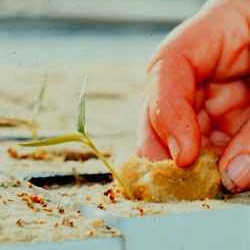
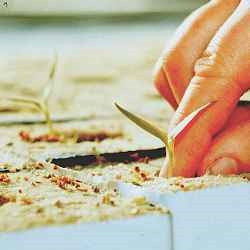
At approximately 2 weeks after seeding – when the first true leaves are visible – the seedlings are transplanted into the larger rockwool cubes. The rockwool blocks are well wetted with full strength feed solution, E.C. 2.5 mmhos at approximately 23°C, prior to transplanting.
The seedling rockwool plug is rotated 90 degrees as the seedling is placed into the rockwool cube (Figure 25). This allows for more root development along the length of the young stem.
The root-zone temperatures should be allowed to drop to 21°C just after transplanting.
The blocks should be watered from the bottom (E.C. = 2.5 mmhos, 21°C) every second day, again ensuring that the blocks remain moist, but not sopping wet.
Target root-zone temperatures of 21°C for the next 2 weeks, when the root-zone temperature is dropped to 20°C. Maintain air temperatures at 24°C. during the day and 22°C at night, for a 24-hour average temperature of 22°C.
Once the seedlings have established in the rockwool cubes, monitor the E.C. of the cube twice a week. The E.C. will rise and can reach levels of up to 7.0 mmhos without damaging the seedlings.
At 3 weeks after seeding (1 week after transplanting) the E.C. of the feed solution should be reduce from 2.5 mmhos to 2.0 mmhos to target a root-zone E.C. of 3.0 to 3.5 mmhos in the block – when the plants are ready for the second transplanting directly into the production greenhouse.
As the plants establish and develop in the rockwool blocks, care must be taken to ensure they have adequate space. Crowded plants will stretch, become tall and spindly and result in poorer quality transplants. The plants should be spaced whenever their leaves begin to touch.
Maintain supplementary lighting, 18-hour days at 160 W/m².
Figure 6. Transplanting the young seedlings into the rockwool blocks, the plug is rotated 90° as it is placed into the space in the top of the block to allow for more root development
At 5 weeks after seeding the plants, the target rootzone temperature should be 20°C. Supplemental lighting is reduced from 18 hours to 14 hours in order to help reduce the ‘light shock’ once the young plants are transplanted into the production greenhouse where no supplemental lighting is used (Portree 1996).
The air temperatures should be 20°C day and night (24-hour average of 20°C ). The root-zone E.C. should now be in the range of 3.0 to 3.5 mmhos. Never water with clear water in order to reduce rootzone E.C.
Figure 7. Monitoring ensures proper temperatures are maintained

Growing media
A number of options growing media can be used in the production greenhouse. For information, see Commercial Greenhouse Production in Alberta: Growing Media chapter.
This web page focuses on using coco coir as the growing media.
Preparing for transplanting
Before the young plants are transplanted, the production greenhouse is set up to receive the plants. A planting density of 3 to 6 plants/m² is recommended. Plants are normally trained with 2 stems per plant (V system), which produces about 6 to 7 stems per metre.
To determine the number of plants required for the greenhouse, multiply the production area (metres) by your desired plant density. The standard pepper grow bag 1 (metre in length) has an approximate volume of 16 to 20 litres when full. The number of rows can then be calculated.
Divide the number of bags required number by the number of rows to calculate the number of bags required per row required. This will allow you to reach the target plant density. The number of bags in a row are spaced out evenly along the length of the row.
Figure 8. Plants are spaced as soon as their leaves begin to touch, this prevents the plants from stretching
Transplanting into the production greenhouse; "house-set"
The young plants are ready to be transplanted into the production greenhouse at 6 weeks of age.
The plants should be approximately 25 cm (10 inches) tall, have about 4 leaves on the main stem, and will have begun to branch. The main stem usually branches into 2 to 3 branches, the point of branching is sometimes referred to as the ‘fork’.
Examination of the underside of the rockwool blocks should reveal a number of roots beginning to develop through the bottom of the block. This is another indication the plants are ready to be transplanted onto into the greenhouse to allow the roots to ‘knit’ into the growing media – for example, coco coir or rockwool slabs.
Figure 9. Conditioned bag

Figure 10. "House-set" transplanting into the production greenhouse
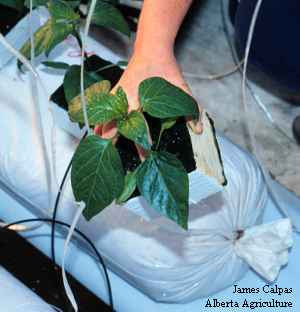
Figure 11. "House-set" transplanting into the production greenhouse
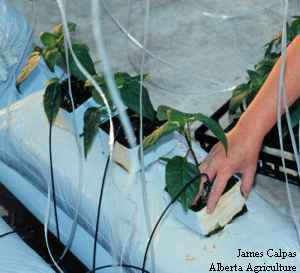
The growing media should be wetted, or ‘conditioned’, with nutrient feed solution (E.C. 2.5 - 3.0 mmhos) for 24 hours before the plants are set onto the media. The general rule is to condition the media with feed solution at the same E.C. as exists in the rockwool block. It is also important to ensure that the media is at 20°C, and that this root zone temperature is maintained throughout the remainder of the growing season.
The plants are then set onto the media, ensuring good contact between the bottom of the rockwool block and the growing media.
If coco coir bags are used as the growing media, 6 plants are grown per 20 litre bag and the bags are slit to provide drainage. Approximately 4 cm (1.5 inches) long, the slits are made on the sides of the bags facing the drainage channel with one slit placed between each of 2 plants. The slits are made to allow for complete drainage of the bags and to avoid ‘pooling’ of the feed solution at the bottom of the bag.
First 2 weeks in the greenhouse
For the first week in the greenhouse, the day/night temperatures are maintained at a constant 20 to 21°C, target a relative humidity of 70 to 80% ( VPD of 3 to 5 gm/cm³). Maintain CO2 levels at 800 to 1,000 ppm.
The primary goal at this stage of the production cycle is to establish the young pepper plants in the media and ensure they develop a strong root system. If the plants do not establish strong roots when they are quite young, they will not develop a strong root system later in the season once the focus of the plants shifts towards fruit production.
Careful attention should be paid to the application of the feed solution; target a 5% overdrain. Overwatering at this point will hinder the development of a strong root system, resulting in a root system that will not perform well under the intense light conditions in the coming summer months. Increase the amount of nutrient solution delivered to maintain the 5% overdrain target as the plants grow larger. Maintain a feed E.C. of 2.5 to 3.5 mmhos. The rootzone E.C. can be allowed to rise to about 4.0 to 4.5 mmhos. As the season progresses and light levels begin to improve, the rootzone E.C. should be brought down to 3.5 to 4.0 mmhos.
During the second week, house-set target day temperatures of 21°C and night temperatures of 16 to 17°C for a 24-hour average of 20 to 21°C. The optimum temperature for vegetative growth in peppers is between 21 and 23°C and for yield about 21°C (Bakker 1989). Establishing the difference in day/night temperature while maintaining the target 24-hour average temperature directs the plants to set flowers. They will also maintain enough vegetative growth required for optimum fruit development and yield.
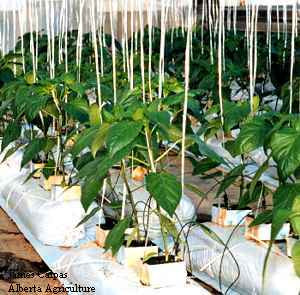
Figure 12. Young plants rooted well into the bag, 2 weeks after transplanting
Plant care
Pruning and plant training
Pepper plants are indeterminate plants. That is, they continually grow new stems and leaves. For this reason they have to be pruned and trained on a regular basis in order to ensure a balanced growth for maximum fruit production.
Pepper plants are managed with 2 main stems per plant, resulting in a density of 12 stems/m² from an initial planting density of 6 plants/m2. Pruning also improves air circulation around the plant which helps to reduce disease (Horbowicz and Stepowska 1995). Plants are generally pruned every 2 weeks. As new leaves and lateral side shoots develop from the axils of the new nodes on the growing stems, the plants have to be pruned to maintain the 2 main-stem architecture of the plant.
The pepper flowers also develop at the nodes. A node is defined as a point on the stem from which leaves arise (Tootil and Blackmore 1984) and the length of stem between nodes is called an internode. The term ‘axil’ refers to the upper angle formed by the junction of a leaf (or lateral) with the stem (Tootil and Blackmore 1984).
One week in
After one week in the greenhouse, all plants will have developed 2 to 3 stem shoots at the fork. At this point, the plants should be pruned to leave the 2 strongest stems. These 2 stems will be managed to carry the full production of the plants throughout the year.
Each stem will grow to a height of up to 4 metres (13 feet) and require support in order to remain upright. Twine hung from the overhead support wires is used to support each stem. The twine is tied to the main stem about 30 centimetres (12 inches) up from the block, one length of twine per stem. Ensure that twine is not tied too tightly to the stem, or the stem can be damaged as it expands.
One other approach with twine is to lay it on the grow bag just before transplanting the plant onto the coco coir. As the plant roots into the coir, it secures the twine. Enough slack is left in the twine so that it can be twisted around the stem as it grows and develops throughout the year.
Early in the season
Early in the season the plants are pruned to one leaf per node. That is, the main leaf at the node is allowed to develop and the lateral stem developing from the node is removed. Beginning in April, a second leaf can be left to develop at every node on the main stem. The lateral stem is allowed to develop to its first node, at which point a leaf develops as well as another secondary lateral stem. The secondary lateral stem is pruned out, leaving the first leaf on the original lateral stem as well as the primary leaf on the main stem.
The reason for leaving this second leaf is to increase the leaf area of the canopy to both make better use of the increasing light levels and to provide shade for the developing fruit. In May, a third leaf (2 leaves on the primary lateral) can be allowed to develop on plants that are in perimeter rows. These plants receive more light because of their position next to the walls. The additional leaves provide the required shading to the fruit as well as increased photosynthetic area.
Care has to be taken when pruning to ensure that the main stem is not ‘blinded’, that the growing point of the main stem is not pruned out. If this occurs the main stem will not develop any further. The main approach to avoid blinding the main stem is to allow the lateral to develop 1.5 to 2.0 centimetres (0.5 to 1.0 inches) before pinching it out. This allows the lateral to be clearly identified an makes it easier to be very clear on what is being removed to ensure that the main stem growing point is left intact.
Throughout the season
It is important to keep pruning the plant as it develops. Once pruning falls behind, there is no catching up without sacrificing some yield, as too much of the plant's resources were allowed to go into undesirable leaf and stem production.
Pruning is done using the fingers or small scissor cutters to ensure precise removal of the laterals, and avoid any damage to the main stem or main stem growing point. When pruning the plants, use a powdered milk solution to dip hands between plants, the protein in the milk works to inactivate viruses that could potentially spread from plant to plant. The use of milk should continue until June (Portree 1996).
Flower and fruit set
The primary goal in managing young pepper plants is to establish a strong vegetative plant on the bags. However, it is important to know when to target the first fruit set and start to establish the balance between stem and leaf production, and fruit production. The presence of fruit will reduce vegetative growth (Bakker 1989) as the balance is established. Pruning and training of the leaves and stems then allows for matching the vegetative growth with fruit growth.
Once this balance is established, it is important to work to maintain the balance for continual, steady production throughout the season. If the crop goes 'out of balance', the production of fruit can occur in flushes interspersed with periods of vegetative growth. In which case growers will have to work hard to direct the plants back into a generative, fruit producing direction. Once the pepper crop establishes a pattern of production (in other words, flushes of fruit production), it is difficult to direct it away from this pattern to a steadier cycle of fruit production.
Optimal temperatures
Flowering, fruit set and fruit size are related to the 24-hour mean temperature as well as to day/night temperature fluctuations (Bakker 1989, Khah and Passam 1992). While fruit set is increased by low temperatures, fruit development may be affected by pollen infertility (Bakker 1989, Khah and Passam 1992). The day/night temperature difference can be used to direct the plant to set flowers and fruit, while the 24-hour average temperature can be used to ensure proper fruit development in the shortest time (Bakker 1989).
The optimum temperature for flowering and fruit set in pepper is 16°C (Pressman et al 1998), while the optimum 24-hour temperature for yield is about 21°C. However, the day/night temperature difference is of minor importance compared with the effect of the 24-hour mean temperature for fruit set, fruit development and the fruit growth period of sweet pepper (Bakker 1989).
Pepper flowers are small under high night temperatures, where they are large under low night temperatures (Pressman et al 1998). The formation of malformed fruit is associated with problems with temperature during pollination. Flattened fruit or ‘buttons’ indicate insufficient pollination as it is associated with the development of very few seeds per fruit (Pressman et al 1998). The functioning of female flower organs is inhibited at low night temperatures (14°C or less), which gives rise to flattened fruit.
The appearance of ‘button’ pepper fruit in Alberta greenhouses is limited to early season fruit developed during the winter. This is the time of the year when providing precise heating to the heads of the plants would help improve flowering, fruit set, fruit development and fruit quality.
Pointed fruit which develop to a similar size as normal blocky fruit probably result from an imbalance of pepper plant growth regulators (hormones) in the developing fruit (Pressman et al 1998).
At high temperatures (32 to 38°C) elongation of the style can occur with a resulting reduction on fruit set (Khah and Passam 1992). Fruit set is known to be reduced at temperatures above 27°C and by low relative humidity (Khah and Passam 1992). There is also evidence of progressive reduction in fruit size associated with increasing light intensity during the high-light summer months (Khah and Passam 1992). Shading the greenhouse can offset some of the effects of high light intensity during the summer months, using a 10% shading about the beginning of June.
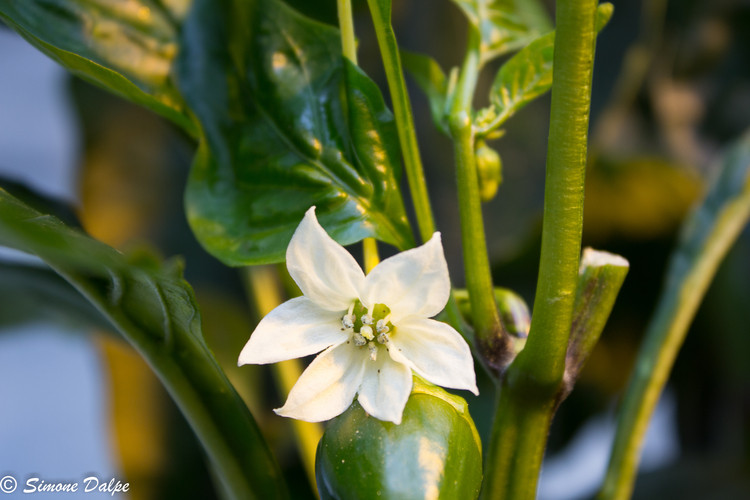
Figure 13. Flower and fruit set
The hot, dry Alberta summers make it nearly impossible to maintain the optimum day-night and 24-hour temperature targets without the use of some form of evaporative cooling (pad and fan or mist systems). For information, see Commercial Greenhouse Production in Alberta: Cooling and humidification chapter.
However, the plants generally do not have trouble continuing to set flowers under these conditions. Stressful summer conditions direct the plants to remain generative and can push the plants to be too generative. The plants have to be managed to maintain adequate leaf cover and balanced fruit load, by leaving more leaves on the plants and targeting about 6 fruit per stem. If too many fruit per stem are allowed to set and the plant is not directing adequate resources to leaf development, the plant will stall and not be able to fill the fruit, resulting in yield loss.
As the day/night temperature difference is established one week after transplanting (while maintaining the 24-hour average temperature target of 20 to 21°C), the plants will be directed to set flowers, with the first flower developing at the fork. The flower developing at the fork should be removed, with the first flower set and resulting fruit set targeted for the second node above the fork.
After this flower sets, the flower at the third node is removed and the fourth node is left to develop. The flowers that follow at the fifth node and upwards are allowed to set freely. If the flower at the second node aborts, allow the third node to set a flower, if this flower sets, remove the flower at the fourth node and then allowing all subsequent flowers to set.
Figure 14. General scheme for targeting the first flower and fruit set
Root zone temperature
Maintaining the root zone temperature at 20°C is also very important for the establishment of the plant balance. Lower root zone temperatures (approximately 15°C) direct the plants to remain vegetative and increase abortion of flowers and young fruit.
Light levels
Abortion of flowers and fruit is related to the rate of production of photosynthetic assimilates and the distribution of assimilate within the plant (Bakker 1989). The number of flowers and fruit creates a demand for plant resources. If the plant cannot meet the demand due to low light levels, high rates of abortion of newly formed fruit can occur (Bakker 1989). Low light levels resulting in flower abortion is thought to result if light levels are low between the fifth and tenth day following the visual appearance of the flower bud (Fierro et al 1994).
Temperatures near the head
Heating close to the developing fruit has been shown to enhance fruit development in tomato (De Koning 1996), and could prove beneficial for peppers. Practically, using a height adjustable heating pipe to maintain 20°C near the top of the plant (or ‘head’) should improve flower set and fruit development during the cold winter months early in the season.
Pollination
Unlike tomatoes, pollination of pepper flowers occurs successfully without any outside pollination assistance required – assuming that the correct temperature targets are established. However, additional pollination assistance (bumble bees or artificial pollination) has been demonstrated to improve the flower set and eventual yield and quality of pepper fruit (Portree 1996, Pressman et al 1998).
It has also been shown that the beneficial effects of pollination appears related to the cultivar grown, with some but not all cultivars demonstrating this enhanced development of fruit in response to pollination (Portree 1996). If bumblebees are used to aid pollination, it is important to manage the bees to ensure they do not visit the individual pepper flowers too aggressively. This can result in scarring of the developing pepper fruit.
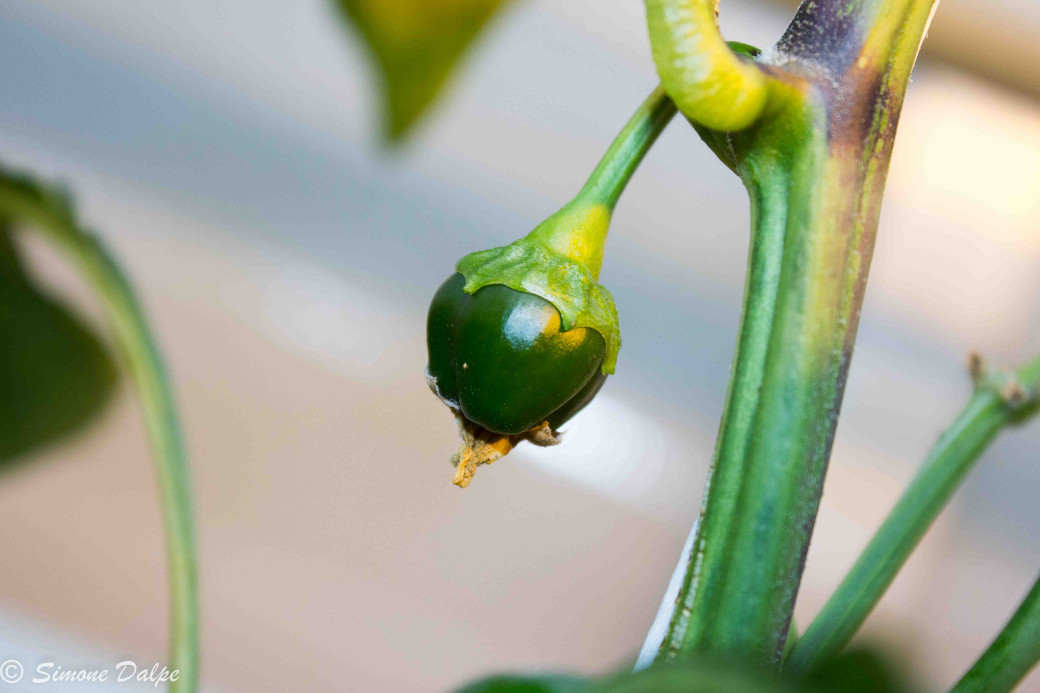
Figure 15. Young fruit, just set
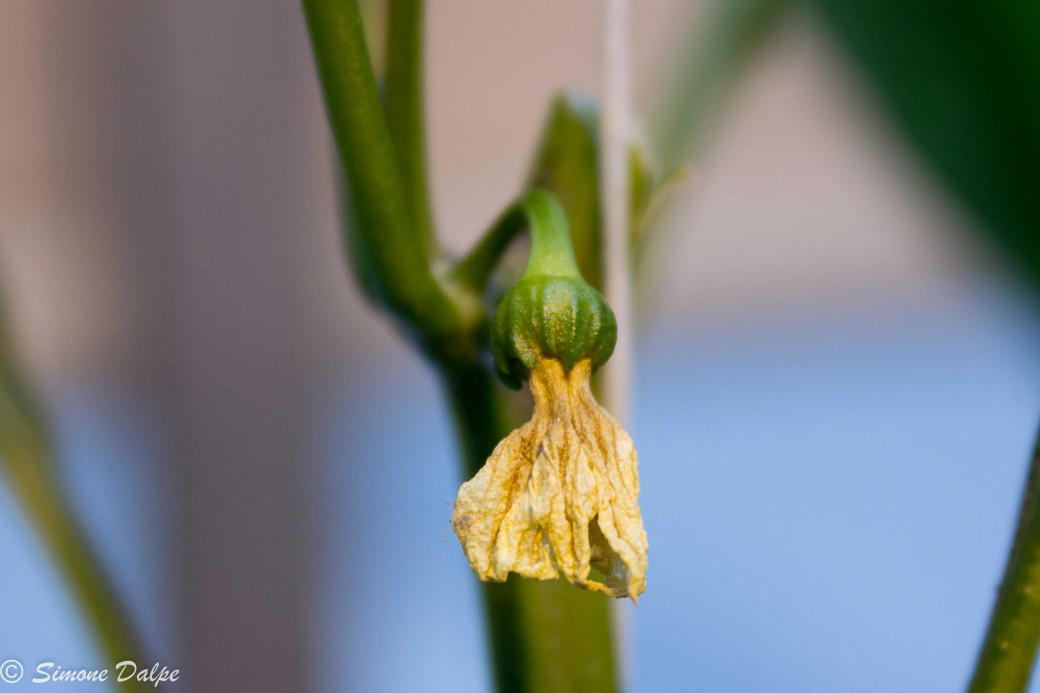
Figure 16. Young fruit, just set
Irrigation
Follow the general recommendations outlined in Commercial Greenhouse Production in Alberta: Application of fertilizer and water.
Target 5% overdrain early in the cycle and increase overdrain up 30% in summer. Increase the amount of water in accordance with the demands of the plant. If the plants have a light green 'halo' at the growing point in the morning, they received adequate water during the previous day. The root zone E.C. will rise if the volume of water is not adequate. Feed at an E.C. in the range of 2.5 to 3.0 mmhos to maintain a root zone E.C. of 3.5 to 4.0 mmhos.
As the season progresses and light levels improve, increase the number of watering events during the day to keep pace with the increasing day lengths. Night watering may also be considered during the summer. Target the first watering within 0.5 hour of sunrise and the last watering about 1 to 1.5 hour of sunset. Target the first overdrain at about 10 am. Pepper plants can take 3.5 to 4.0 litres of water a day during the summer.
Harvesting and grading
It takes between 7 and 9 weeks from fruit set to harvest, taking longer during the low light periods of the year. The fruit is harvested at 85 - 90% colour and a knife is used to make clean cuts on the peduncle (fruit stem) and care must be taken not to cut into adjacent fruit or stems.
Table 1. Guide to Pepper Grade
| Size (Fruit diameter in millimetres) | Grade |
| Extra Large | |
| 70 - 79 mm | Large |
| 60 - 69 mm | Medium |
| 50 - 59 mm | Chopper |
Fruit are graded according to size; larger-sized pepper usually command a higher price. While the size potential of pepper fruit is determined by the cultivar, the management of the crop determines whether or not the maximum size potential is met for the greatest number of fruit picked. Proper management of the greenhouse environment and plant handling are needed to establish and maintain optimal plant balance; this results in optimal crop yield and fruit size.
Table 2. Costs and Returns for Pepper Producing Greenhouses in Alberta, 2017
| Production Area: 4,783 m2 Number of Producers: 6 | |||
|
|
| Total $ | $/m2 |
| (A) | Crop Sales – imputed value of production | 389,635.17 | 81.46 |
|
| Crop insurance receipts | 0.00 | - |
|
| Miscellaneous receipts | 2,029.83 | 0.42 |
|
| Gross Return | 391,665.00 | 81.88 |
|
|
|
|
|
| (B) | Growing media, Seed/Cuttings | 50,029.53 | 10.46 |
|
| Fertilizer and Chemicals | 21,215.36 | 4.44 |
|
| Greenhouse Insurance | 10,618.78 | 2.22 |
|
| Trays, boxes and other packaging | 12,779.72 | 2.67 |
|
| Freight and/or trucking costs | 3,189.34 | 0.67 |
|
| Auto fuel, repairs, licenses and auto insurance | 10,689.23 | 2.23 |
|
| Repairs – buildings and equipment | 4,445.47 | 0.93 |
|
| Utilities – Natural gas 5000 GJ | 61,258.47 | 12.81 |
|
| Electricity 0.00 KWh | 37,835.22 | 7.91 |
|
| Water 0.00 m3 | 7,285.00 | 1.52 |
|
| Phone | 311.09 | 0.07 |
|
| Custom work and specialized labour | 2,757.23 | 0.58 |
|
| Marketing costs | 39,483.83 | 8.25 |
|
| Associate dues, Professional fees and promotion | 3,833.84 | 0.80 |
|
| Small tools, supplies and miscellaneous expenses | 2,115.69 | 0.44 |
|
| Operating interest paid | 974.00 | 0.20 |
|
| Labour insurance/Benefits | 1816.83 | 0.38 |
|
| Hired Labour 9,465.05 hours | 132,514.55 | 27.70 |
|
| Unpaid Labour 943.25 hours | 19,500.32 | 4.08 |
|
| Variable costs | 422,653.50 | 88.36 |
|
|
|
|
|
| (C) | Property/Business taxes | 3,948.17 | 0.83 |
|
| Equipment and building A) Depreciation | 25,727.37 | 5.38 |
|
| B) Lease payments | 0.00 | 0.00 |
|
| Paid Capital interest | 8,604.09 | 1.80 |
|
| Total Capital Costs | 38,279.63 | 8.01 |
|
|
|
|
|
| (D) | Cash costs: (B+C-B19-C2a) | 415,705.44 | 86.91 |
| (E) | Total production costs: (B+C) | 460,933.13 | 96.37 |
|
|
|
|
|
| (F) | Gross Margin: (A-D) | -24,040.44 | -5.03 |
|
| Return to unpaid labour: (A-E+B19) | -49,767.81 | -10.41 |
|
| Return to investment: (A-E+C3) -8.7% | -60,664.04 | -12.69 |
|
| Return to equity: (A-E) | -69,268.13 | -14.49 |
Notes:
- Most of the greenhouse operations are using "Biological Control" for pests
- Miscellaneous costs include bank service charges, equipment lease/rental, crop supplies and construction material, etc.
- Operator's labour is included under investment costs
- Return to management is excess of revenue over all expenses
*** Emmanuel Laate, 2017
The zen of greenhouse peppers
Greenhouse peppers can be a challenging crop to grow. Once the plants establish a pattern of growth it can be difficult to manage them in another direction. For example, if the plants are strongly vegetative, it can take some time to direct the plants to be more generative, and vice versa. It is important to establish the proper balance in the plants as early as possible to set the stage for continuous, sustainable production and resulting high yields.
Particular points of challenge with pepper production include setting and holding the first fruit. Fruit set is targeted at the second or third note above the fork where the plant breaks into 2 stems. The challenge here is that the young plant is generally strongly vegetative, a requirement for good establishment in the coco coir bag and eventual filling of fruit. Such plants tend to want to remain vegetative. By establishing the proper 24-hour average temperature of about 20 to 20.5°C with a day temperature of 21°C and a night temperature reaching 16 - 17°C and holding this regime, the plants will be directed to set and hold fruit.
The next point of challenge is to have an adequate fruit load established on the stems before the first fruit are picked. If the first fruit set and subsequent flowers do not set, when the first fruit are harvested all the energy of the plant will go towards vegetative growth. The plants will ‘race’ to the wire with a resulting significant loss of yield.
A good balance is established when 5 to 6 plants consistently maintain fruit on all stems – 10 to 12 fruit per plant. Assuming there are no drastic changes in the crop's management, balance will likely be maintained until the end of the season. Fruit take approximately 7 weeks to mature.
As the season progresses it is important to pay close attention to the plants. The following are a few signals that the plants may exhibit, and how to interpret them.
Flowers
Flowers upward facing and weak
This means the plant is too generative. To correct it, reduce night temperature to drop the 24-hour average temperature by 1°C . This will direct the plant to be more vegetative. Weak flowers usually occur during the summer months, although they can show up earlier if the greenhouse is run too warm.
Flowers large, bullish, thick peduncles, flowers opening downward
This is an indication the plant is too vegetative. Raise the night temperature to bring the 24-hour average temperature up by 1 or 1.5°C. The fruit from these large flowers often abort or are deformed.
Flowers opening downward, right-sized
Figure 17. Normal bell pepper flowers – the Zen state
Fruit
Fruit abortion
Most fruit abort within 1 week of fruit set as a result of the plant’s unwillingness to carry the fruit. The plant is either too vegetative (needs to be directed to set and hold fruit by raising the 24-hour average temperature 1°C) or too generative (is dropping young fruit because it is already carrying too much of a load). These plants can be directed vegetatively by lowering the 24-hour average temperature 1 or 2°C.
Misshapen fruit, tails
Most problems with fruit shape are related to poor temperature conditions during flowering. Usually seen when air temperatures fall below 14°C for periods over the course of a few days, primarily during the winter months. Lygus bugs can also cause fruit shape problems. The bugs are fed by inserting their mouthparts into the very young peppers, much like mosquitoes feed on people. The damage becomes apparent when the fruit continues to develop and the damaged tissue tears open. Lygus bugs can even top the plant by killing the growing point.
Cracking/split fruit
Fine cracks on the skin (russeting) occurs when the relative humidity in the greenhouse rises above 85%. Fruit splitting can occur as a result of high root pressures when the night air temperatures are cool and root zone temperatures are high. It is also important not to water too late in the day.
Sizing but not reaching mature colour
Peppers can reach mature size, but do not completely reach mature colour over the entire fruit – even after 8 weeks. This condition is thought to be related to lower 24-hour average temperatures. Raising the 24-hour average temperature 0.5°C should help to correct this problem in the crop.
Premature fruit drop
This is when fruit mature to size and not yet to colour, and premature abscission, or fruit drop, occurs. The problem is seen early in the season, affecting the first fruit to size. It appears to be related to low boron levels in the feed.
Fruit reaching mature colour but not sizing
Small fruit usually indicate a plant that is too generative – one that has put more resources into setting fruit and not enough resources into developing the leaf area required to fill the fruit. These plants also have very short internodes and small leaves, and appear stalled. Reduce the night temperature by 1 or 2°C to direct the plant to be more vegetative. Target internode lengths of approximately 6 to 7 centimetres. Remember that secondary fruit produced on laterals will always be smaller than primary fruit on the main stem.
Blossom end rot
This may appear at the blossom end or on the side of the fruit. Blossom end rot is due to a calcium deficiency, or reduced translocation of calcium to the fruit. It can result under conditions of lower transpiration or a shortage of water. A high E.C. in the root zone restricts the uptake of water. Maintain an active environment so that the plants are transpiring. If the problem does not rectify, apply a spray of 400 ppm calcium chloride solution to the plants.
Sun scald
During the summer months, under high solar radiation any fruit exposed to direct sunlight can develop sun scald. The symptoms of sun scald appear similar to those due to blossom end rot. Ensure that adequate leaf cover is maintained to shade the fruit from direct sunlight.
Leaves
Turning over, underside of leaves face up
This behaviour is common when the plants are first set out into the production greenhouse and is also seen on established plants, usually in outside rows. The condition appears to be related to high vapour pressure deficits. This can happen when transplants are moved from the nursery into conditions of lower relative humidity in the greenhouse.
Curling, from the edges in
Seen primarily on older leaves, although some cultivars may have more of a tendency to exhibit this characteristic, this is not considered to be a problem. If excessive curling and twisting is seen on the young growth this can be an indication that herbicides have drifted into the greenhouse.
Interveinal chlorosis
As the leaf ages to over 3 months old, the tendency of developing interveinal chlorosis increases. A result of ageing and senescence, these leaves are no longer as active in the development of the plant and fruit. The plant can mine the leaf, removing mobile nutrients for use on other parts of the plant. This behaviour is normal.
Interveinal chlorosis on the younger leaves can indicate a problem with the nutrient solution or that the root zone temperatures are exceeding 23°C. It is important to keep the root zone temperatures in the 19 to 22°C range.
Large leaves
Large leaves are a sign of a strong vegetative plant. This is not seen as a problem if the fruit set is also good.
Small leaves
Indicates that the plant is generative, which should also be apparent by a heavy fruit set. The plant may be too generative if the fruit is taking too long to ripen and are undersized. As well as lowering the 24-hour average temperature, under summer conditions it is recommended to have about 20 ppm of ammonium nitrogen. This will help to direct the plant to be more vegetative.
Authored by Dr. James Calpas